PotentiometerBar
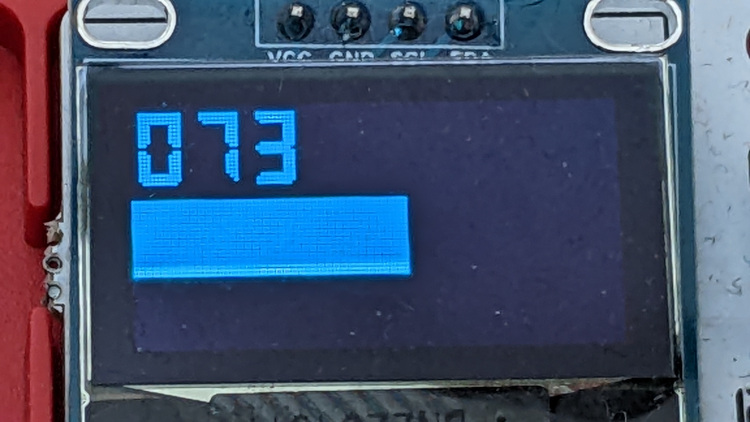
Sometimes you want a bar on your OLED screen. This is a small example where you can make a bar using the potentiometer.
I made a very small number library for that, which is included in the ubp file.
Below is an example of how it looks on your OLED. I made use of the defer display updates and show display buffer blocks to get rid of the flickering.
https://wiki.microblocks.fun/extension_libraries/oled#defer-display-updates
and
https://wiki.microblocks.fun/extension_libraries/oled#show-display-buffer
Have fun.....
Comments
-
very interesting/advanced. I'm not able to follow.
I'd really like to figure what is happening within this code (for learning micro block code tricks of course).
Can you document any of this with comments added to help one understand. For example, when/where Potentiometer values are inserted to make their way to _imgData for the 0-100 number display and of course the rectangle bar display.
Also, _imgHex.... where is this created/ found (the hex string)?
tx
Gilles
0 -
Best place to start is the MicroBlocks WIKI, SNAP section, and then follow the article Snap2MB there. It explains the OLED pixel map and its operation at a high level. You can also see the SNAP code, which is also all blocks, taking a PNG image, creating a table of pixels, and manipulating them into the format I used in MicroBlocks. The entire OLED library is written in blocks and still runs very fast. Images converted into MB _imgData list format and the manipulating code is then transferred to the Clipboard and pasted into MB as a program that gens the image.
Very glad to see that you are taking an interest into the adv features of MB. You will not be disappointed.
Don't hesitate to ask for help as you are experimenting.
1 -
Hi @barriereg
I learned a lot from looking at example codes in MicroBlocks and reading the wiki.
@Turgut Is talking about this section of the wiki https://wiki.microblocks.fun/snap/snap2mb_img_code
I now see I don´t have a use for the numberslist anymore. It was added when I was still experimenting with the code. It can be removed completely from the code.
I am still learning how to use all the power of MicroBricks and it is a pleasant journey. 😎
0 -
0
-
I tried running this link. I must be missing something or confused. Most likely the later...Haha.
0 -
This is what I get when attempting to run
tx
Gilles
0 -
You have to import that file into Snap!
https://snap.berkeley.edu/snap/snap.html
Then check javascript extensions.
So you will have to learn also a little bit about how Snap! works.
0 -
@PeterMathijssen , I was able to import into Snap. Thanks for the Snap program link. I checked off Java as you mentioned and ran one of the images.
I pasted the generated saved clipboard into word to see that the program works as described.
Tried to change costumes but it goes back to Snap logo.
Took a photo with camera an all costumes disappear.
I must be close???
tx
Gilles
0 -
The sprite costume selection has to happen in the block code costume drop-down menu; not in the sprite costume you select by going into costumes page.
0 -
Here?
0 -
No in the orange newProcImage block there is a dropdownmenu. Choose the image there.
0 -
Disregard last tx... I figured it out... drop down within script.
tx
Gilles
1 -
Having fun with Snap and Microblocks image program. One issue I'm having is I get a blank when generating some image including any I create.
For example Alonzo supplied in example does not work. So I exported and edited image to get 128X64 size. Re-imported to Snap then ran. This is what I get.
any suggestions?
tx
Gilles
0 -
Did you change the BWthreshold value and see what happens? I always start with BW images so I never had that problem. 😉
0 -
Images do not have to be 128×64, unless that's what you want.
Color image rgb values are averaged to reduce to bw values. And then the BWthreshold value will give you some adjustability depending on the color value range of the image. This is by no means a polished image editing program. It is a concept application to demonstrate data and code transfer to MB program via Clipboard. Experiment and adjust code to suit your ambitions. There is no right or wrong way.
0 -
Experimenting is the fun part for me. I also started with making 128x64 images because I thought that was how it worked. But then I learned to make smaller images. This gave much more freedom how to use them and also made smaller scripts.
0
Howdy, Stranger!
Categories
- 129 All Categories
- 4 Community
- 4 Hello Maker!
- 108 PicoBricks - Make, Run, Split, Merge
- 2 PicoBricks IDE
- 1 Arduino IDE
- 34 Hardware Support
- 15 PicoBricks Backers Hub
- 51 MicroBlocks Support
- 3 Shipping Support
- 2 MicroPython
- 1 REX - 8 in 1
- Mechanical Parts and Parkour
- REX Main
- 1 Arduino-IDE
- REX - Shipping
- 16 Products & Technology
- 2 Raspberry Pi
- Arduino
- 14 Other


